Poker Starting Hands: Play the Odds, Not Just the Cards
Now that you understand the position concept we are going to expand on that by looking at the subject of which starting hands to play and which to throw in the muck.
This is the area where many new players go wrong, simply by not having the discipline to fold weaker hands before the flop. You can avoid unnecessary losses at this stage of the hand simply by choosing not to play.
The Importance of Starting Hand Selection
As you know Poker is a game of maths and probability. It is therefore possible to estimate which starting hands are more likely to win based on probability, and various studies have ranked starting hands according to how likely they are to win the hand against a random selection of opponent’s starting hands.
Starting hand
By Starting Hand we mean the two hole cards which are dealt to you at the start of each hand.
Since we now know which starting hands are statistically strongest, we can apply this knowledge to our strategy.
Remember, when we play a hand, we want to play with the odds in our favour — and by selectively choosing which starting hands we play, we base our strategy on proven mathematical edges.
While the very best starting hands only come around occasionally, we can still build a solid and disciplined strategy by expanding our range thoughtfully — especially when we’re in position.
So we combine the position concept with our starting hand concept, playing a narrower range out of position and a wider range in position. The advantage of acting later helps reduce the risk of playing slightly weaker hands.
Starting Hand Groups
There’s a wealth of statistical research out there, but we’ve summarised the key concepts into an easy-to-follow starting hand system.
The following section is a key part of your strategy and you should practise choosing the right action before the flop using the poker starting hands chart below.
We’ve identified 46 starting hands that form the foundation of a solid pre-flop strategy, based on statistical strength and the position and situation we are in.
These 46 hands have been separated into 8 groups named Group A to H. Group A are the strongest hands in poker based on the statistics and group H are the weakest hands that we are willing to play.
Of course there are many more hand combinations weaker than the hands in Group H, but these fall outside the scope of this strategy and should be folded immediately in most beginner-level situations.
Group A
AA
KK
AKs
Group B
AK
Group C
JJ
TT
Group D
AQs
AQ
AJs
99
88
Group E
AJ
ATs
KQs
77
66
55
Group F
AT
KQ
KJs
QJs
44
33
22
Group G
A9s to A2s
KTs
QTs
JTs
J9s
T9s
98s
Group H
KJ
KT
QJ
J8s
T8s
87s
76s
The ‘s’ next to some of the hands stands for Suited, so two cards of the same suit. ‘AJs’ could stand for A J whereas ‘AJ’ could stand for A
 J
J
Take a minute just to browse the hands in each group, you don’t need to memorise these, as you can use the chart to refer to, and once you have used it for a while, you will start to remember which hands are in which groups.
Poker Starting Hand Charts
Ok, so now we have our selection of 46 hands, and have split them into 8 groups based on strength, now what?
We won’t automatically play any of those 46 hands just because they’re on the list — each decision should be based on your position and the specific situation at the table.
When we are in position we will play a wider range of groups and out of position we will only play the stronger groups. Similarly when opponents have shown strength at the table by raising we will only play the better cards against them.
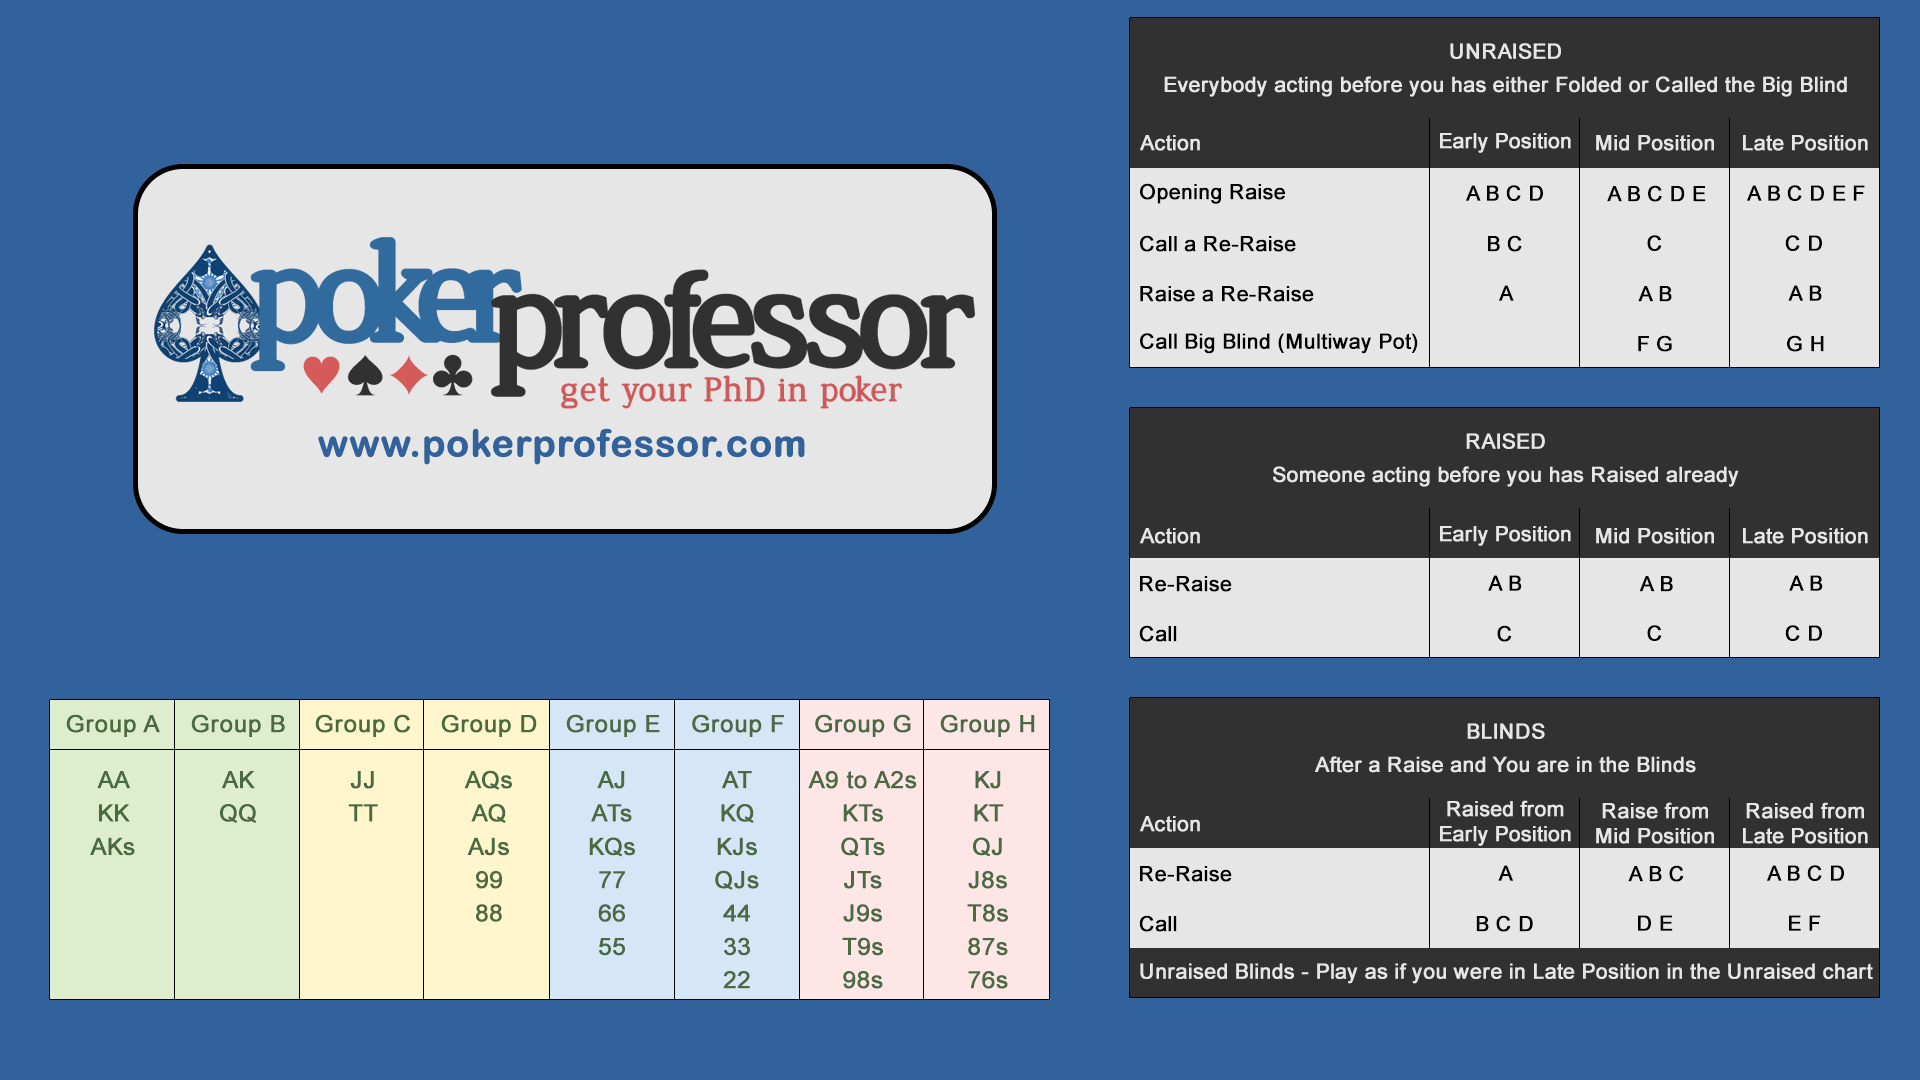
There are three charts, UNRAISED, RAISED and BLINDS. These are our Action charts, and show us what action to take when we have a hand in one of the starting hand groups.
The three charts are:
- UNRAISED – When everybody acting before you has either folded or called the big blind.
- RAISED – When somebody acting before you has raised.
- BLINDS – When you are in either the small blind or the big blind position and somebody acting before you has raised
| UNRAISED | ||||
|---|---|---|---|---|
| Everybody acting before you has either Folded or Called the Big Blind | ||||
| Action | Early Position | Mid Position | Late Position | |
| Opening Raise | A B C D | A B C D E | A B C D E F | |
| Call a Re-Raise | B C | C | C D | |
| Raise a Re-Raise | A | A B | A B | |
| Call the Big Blind (if Multiway Pot) | F G | G H | ||
| RAISED | ||||
|---|---|---|---|---|
| Someone acting before you has Raised already | ||||
| Action | Early Position | Mid Position | Late Position | |
| Re-Raise | A B | A B | A B | |
| Call | C | C | C D | |
| BLINDS | ||||
|---|---|---|---|---|
| After a Raise and You are in the Blinds | ||||
| Action | Raised from Early Position | Raise from Mid Position | Raised from Late Position | |
| Unraised Blinds – Play as if you were in Late Position in the Unraised chart | ||||
| Re-Raise | A | A B C | A B C D | |
| Call | B C D | D E | E F | |
To use the charts, just follow these steps:
- What group is your starting hand in? if it isn’t in any group then you Fold.
- What Situation are you in? Choose one of the three action charts relevant to the situation you are in.
- What Position are you in? Look at the column in the chart for the position you are in.
- Starting Hand Group not shown? If your starting hand group is not shown in that column, then you Fold.
- Starting Hand Group Shown? If your starting hand group letter is shown then take the action the chart is showing you.
The different actions in each of the charts are:
- Opening Raise – Make the first Raise
- Call – Just Call when a person has Raised
- Re-Raise – Re-Raise a person who has Raised
- Call a Re-Raise – Call when someone Re-Raises your original Raise
- Raise a Re-Raise – Re-Raise when somebody has Re-Raised your original Raise
- Call the Big Blind – Just call the big blind amount (also known as ‘limping in’)
Quick Reference
I don’t expect you to memorise all the starting hand groups and action charts. The way to learn them is by putting them into practise and then over time you will start to memorise them. But to start with, you can refer to the charts while you are playing.
You can either just bookmark and pull this page up each time you play or we have a couple of other methods to make your life a bit easier.

Printable Starting Hands Chart
A neat and tidy, A4 size starting hand chart which you can print and keep in front of you for quick reference while you are playing.
To download the Starting Hands Chart right click on the link and select save target as.
It is a PDF file, so to view and print this you will need the free Adobe Acrobat Reader.
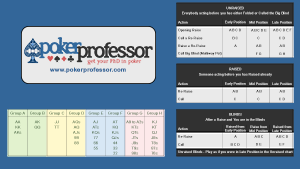
Starting Hands Chart Desktop Wallpaper
Use this as your computer desktop wallpaper. It is designed so that whilst you are playing poker, you can place your poker table window over the Poker Professor logo and all the charts will be visible around the table. Neat huh!
To download the Starting Hands Wallpaper right click on the link and select save target as.
To set as your desktop wallpaper, right click on the file you have just downloaded and select “Set As Desktop Background”.
The wallpaper is optimised for a desktop screen size of 1920×1080 as this is the most common. It should work with most other desktop sizes as well, as Windows and most operating systems will usually resize it automatically.
Starting Hand Examples
Lets take a look at some example starting hands and walk through what the charts are telling you to do and what thought process to follow.
Example Hand 1
You are sitting in early position and are dealt A J. You are first to act and so nobody has bet before you.
- What group is my hand in – AJ is a Group E hand
- What situation am I in – Nobody has raised before me so UNRAISED
- What position am I in – Early Position
So from the answers to the above questions we look at the UNRAISED Action chart, and look in the column for Early Position. You will see that Group E is not shown in that column so we are not allowed to play a Group E hand in Early position in this situation and so we would fold this hand.
Example Hand 2
You are sitting in early position and are dealt A K . You are first to act and so nobody has bet before you.
- What group is my hand in – AK is a Group B hand
- What situation am I in – I am first to act so it is UNRAISED
- What position am I in – Early Position
So from the above we look at the UNRAISED Action chart, and look in the column for Early Position. You will see that with a group B hand we are told to make an opening raise. So we would enter the hand by making a Raise (We will look at details of how much to raise later in the lesson).
Example Hand 3
You are sitting in Mid Position and are dealt A A. A Player in early position has raised the pot up to 3 times the Big Blind.
- What group is my hand in – AA is the best starting hand and therefore a Group A hand
- What situation am I in – There has been a raise by a player in early position, so it has been RAISED
- What position am I in – Mid Position
So, we look at the RAISED Action chart, and look in the column for Mid Position. You will see that with a group A hand we are told to make a Re-Raise. So we would enter the hand by making a Re-Raise. (We will look at details of how much to raise later in the lesson)
Example Hand 4
You are sitting in Mid Position and are dealt 9 9. A Player in early position has raised the pot up to 3 times the Big Blind.
- What group is my hand in – 99 is a Group D hand
- What situation am I in – There has been a raise by a player in early position, so it has been RAISED
- What position am I in – Mid Position
So, again we look at the RAISED Action chart, and look in the column for Mid Position. You will see that we are not allowed to play an already RAISED pot in Mid Position with a group D hand. So we fold this hand.
Example Hand 5
You are sitting in Late Position and are dealt 8 7. Two Players acting before you have limped in and called the big blind.
- What group is my hand in – 87s is a Group H hand
- What situation am I in – There has been two limpers, but no raise, so it is UNRAISED
- What position am I in – Late Position
So, we look at the UNRAISED Action chart, and look in the column for Late Position. You will see that we are allowed to Call a Multi-way pot with a group H hand (multiple players playing the hand).
Since two players have already called and the blinds may also enter the pot, this is a standard spot to call the big blind according to our starting hand chart.
How much should I Raise?
An opening raise is generally between 3 to 4 times the Big Blind. Anywhere in this range is a sound starting point, and as a guide, I recommend the following amounts:
- When you are in EARLY POSITION Raise 4 times the Big Blind
- When you are in MID POSITION Raise 3.5 times the Big Blind
- When you are in LATE POSITION Raise 3 times the Big Blind
You should mix and match the size of your raises to prevent your opponents getting a read on your betting patterns, but the above can act as a general guide whilst you get used to your new strategy.
The reason to Raise more in Early position is because we are out of position and want to put as much pressure on our opponents as we can.
How much should I Re-Raise?
A Re-Raise should in general be between 2 – 4 times the original Raise, As a guide:
- When it has been Raised from EARLY POSITION Raise 2 times the Raise
- When it has been Raised from MID POSITION Raise 3 times the Raise
- When it has been Raised from LATE POSITION Raise 4 times the Raise
The reason for this is it is more likely that a player in late position has raised with a weaker hand than a player in Early position.
Practise Time
Well, that was a lengthy lesson and a lot to take in. Don’t worry, with practise it will start to become second nature, and that is exactly what you should do now with the first stage of your bankroll challenge.
Poker Bankroll Challenge: Stage 1
- Stakes: $0.02/$0.04
- Buy In: $3 (75 x BB)
- Starting Bankroll: $25
- Target: $3 (1 x Buy In)
- Target Bankroll: $28
- Estimated Sessions: 1
Use this exercise to get used to selecting which starting hands to play and which not to play according to the Starting Hands chart and get used to understanding what position you are in at the table. Don’t get too carried away at this stage though, play conservatively and be aware that someone may have a better hand than you. We are going to learn in more detail about betting after the flop later in the course.
Practise what you’ve learned with the Bankroll Challenge — a structured, hands-on way to build good habits and responsible bankroll management. Goals shown are for illustration only; results will vary.